PC/CP320 Physical Computing
Raspberry Pi Python GPIO and Serial Console
Introduction
Objectives
- To introduce Python programming on the Raspberry Pi
- To become familiar with Raspberry Pi GPIO pins and
BOARD and BCM numbering schemes
- To learn nano editor commands
- To introduce using the serial console on the Raspberry Pi
Preparation
Equipment
- Raspberry Pi
- TTL-serial to USB adapter
- LED and 1k resistor. (Depending on brightness, you may
need a smaller resistor.)
Procedure

|
The Rapsberry Pi GPIO pins can easily be damaged with
improper handling.
|
-
Testing the Serial adapter driver
installation
Connect the TTL-serial cable
via the USB cable to the computer,
Open the Device Manager and check to see what COM port the
adapter appeared on.
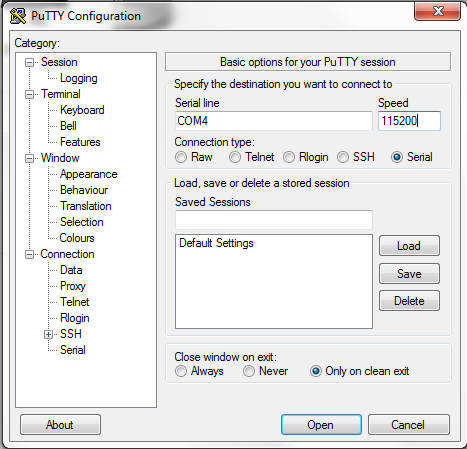
- Open putty, and set it for
serial on the COM port just noted and set the
baud rate to 115200.
-
Any time you connect anything to the
GPIO pins, make
sure you know the correct orientation!!!
Connect the TTL-serial cable to the Raspberry Pi as
follows:
- Don't connect the red
wire.
- Connect the black wire to GROUND.
- Connect the white wire to TxD.
Use a white wire for the connection!
- Connect the green wire to RxD.
Use a green wire for the connection!
- Plug in the Pi, and you should see the boot process in the
serial console and get a login prompt as expected.
Show this to the lab
instructor.
-
Here are some common commands for linux. Note that the cursor up
and down keys take you through a history of previously used commands.
| Common linux commands
|
| Command
|
Description
|
Example
|
|
ls
|
list files in directory
|
ls
*.py
|
|
cp
|
copy a file
|
cp
test.py newtest.py
|
|
mv
|
move (or rename) a file
|
mv
oldtest.py newtest.py
|
|
sudo
|
execute program as superuser
|
sudo
python3 test.py
|
|
mount
|
mount external (flash) drive
|
mount
/mnt/usb
|
|
umount
|
unmount external (flash) drive
|
umount
/mnt/usb
|
|
shutdown
|
shutdown computer properly
|
sudo shutdown
-h now
|
Here are some common commands for nano.
| Common nano commands
|
| Command
|
Description
|
|
CTRL-K
|
cut line(s)
|
|
CTRL-U
|
uncut line(s) (i.e. paste)
|
|
CTRL-X
|
save and quit
|
|
CTRL-O
|
save without quitting
|
-
Running the first python test program
Since there may be code for some other
purpose already on the Pi, delete it by typing:
rm gpio_test_basic.py
- Download gpio_test_basic.py
according to the serial
console wifi instructions.
Note: An alternative way to copy a program is to
- Open the file on the PC
- Start the nano editor
on the Raspberry Pi
- Copy the program from the window on the PC and paste
it into the terminal window. (On the PC, copy with CTRL-C
and paste in the terminal window by clicking the right
mouse button.)
- Exit nano giving the file whatever
name you want.
(A good choice would be gpio_test_basic.py. )
- Connect the GPIO pin to
the LED in series with the resistor to ground
to observe the output.
- To run a program, type
sudo python3 gpio_test_basic.py
(Note: typing "python" instead of "python3" will use
python 2 instead.)
Note: If the program doesn't access GPIO pins you don't need
sudo.
- To exit a program type CTRL-C.
- Now try to re-run the program. What happens?
GPIO pins are not automatically released when a program
stops. In order for this to happen you must release them
before the program exits.
- Download gpio_test_2.py
- Run the program, as before, and then exit out. Rerun it and
see what happens.
This program makes sure that GPIO pins are released at the
end. This is a template you should always
follow.
-
Make a copy of the program so that you can edit the copy.
To do this, type
cp gpio_test_2.py test.py
Now you can edit test.py
using nano.
(Save and exit nano with CTRL-X.)
-
Modify the program to use the same pin GPIO18
but using the Broadcom
numbering scheme.
Show the modified working program to
the lab
instructor.
-
Using Pulse Width Modulation on GPIO18
Broadcom pin GPIO18 has the ability to produce asquare wave
output using Pulse Width
Modulation or PWM. Once started, a square wave
will be produced without the program having to toggle the pin
explicitly. To set it up, after the pin is set to output
p = GPIO.PWM(12, 60)
will set up the pin for a 60Hz waveform.
p.start(50)
will turn it ON with a 50% duty cycle and
p.stop()
will turn it OFF.
p.ChangeDutyCycle(20)
will change the duty cycle to 20% without stopping it
and
p.ChangeFrequency(100)
will change the frequency to 100Hz without stopping.
Download pwm_test_2018.py
-
Now connect the LED and resistor to the pin, and
run the program to
see how changing
the duty cycle changes the brightness.
- Change the frequency to see how low it can go before you see
the LED flickering.
- Change the duty cycles to see how small a difference in
brightness you can detect.
- Remove (or comment out) the command to stop the pwm at the
end of the
program. Run the program and see what happens when the program
stops. (You may need to remove the cleanup line as well.)
-
As before, modify the program to use the same pin GPIO18
but using the Broadcom
numbering scheme.
Demonstrate the output using the
LED
and the effect of changing the duty cycle
to the lab
instructor.
-
Backing up test programs to flash drive
If you have a flash drive, in sert in into one of the USB ports
and type
mount /mnt/usb
You should be able to use the cp
command to copy files to the flash drive.
You should be able to use the ls
command to see that the files were copied to the flash drive.
Before you remove the drive, be sure to unmount
it
using
umount /mnt/usb
Show this to the lab instructor.
-
Proper shutdown
Shut down the pi using
sudo shutdown -h now
When shutdown is complete, you can disconnect power and put
everything away.
Wilfrid Laurier University
© 2019 Wilfrid Laurier University


